Castling in Chess: Kingside and Queenside
Castling moves king and rook in one turn: the king moves two squares toward a rook, which jumps to the crossed square. Three conditions decide when it is legal.
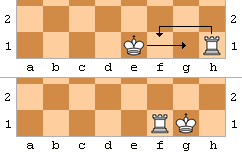
Castling is the only move in chess that relocates two pieces at once. The king slides two squares toward one of its own rooks, and that rook jumps to the square the king just crossed. It happens in one turn, it’s written O-O for the short version and O-O-O for the long one, and it’s legal exactly once per side, per game, provided three conditions are all true at the same moment you try it.
Skip it and the cost shows up fast. A king still sitting on e1 or e8 in the middlegame is a target for every open file and diagonal an opponent can build toward it, and club players lose more games to an exposed king than to almost any single tactical pattern. This guide covers the mechanics precisely: which squares the king and rook actually land on, the exact conditions that make castling illegal, and why the same players who annotate their own games in books like Logical Chess: Move by Move castle inside their first dozen moves instead of chasing a pawn.
What is castling?
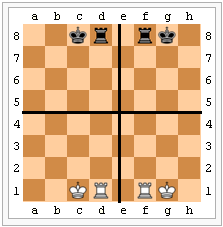
Castling is a move of the king and one rook, played in a single turn and counted as a king move for every rule that cares about move order. White can castle kingside, written O-O: the king goes from e1 to g1, and the rook on h1 jumps over it to f1. White can castle queenside, written O-O-O: the king goes from e1 to c1, and the rook on a1 jumps to d1. Black’s version mirrors it on the eighth rank: e8 to g8 with the h8 rook landing on f8, or e8 to c8 with the a8 rook landing on d8.
FIDE’s Laws of Chess define both directions with a single sentence: the king moves two squares toward the rook, and “that rook is transferred to the square the king has just crossed” (Article 3.8.2). One rule, two destinations, because the rook always lands on the square the king passed through on its way to safety.
How castling works
The three conditions, all required at once. FIDE Article 3.8 lays out exactly when castling is and isn’t legal:
- Neither the king nor that specific rook has moved before, at any earlier point in the game. This is permanent. If your king walked to e2 and back to e1 on move 4 to escape a check, you have lost the right to castle at all, forever, in that game, even though the king is sitting back on its original square. The same applies per rook: if only your h1 rook has moved, you can still castle queenside with the a1 rook. The two sides are tracked independently.
- No pieces, of either color, sit between the king and that rook. Kingside needs f1 and g1 empty (two squares). Queenside needs d1, c1, and b1 empty (three squares), which is the extra requirement that makes queenside castling arrive a few moves later than kingside in most games.
- The king is not in check, does not pass through an attacked square, and does not land on an attacked square. This is the part players get wrong most often, so it’s worth stating precisely: only the king’s own squares matter. The rook can be under attack. The rook can even pass through a square an enemy piece controls. None of that blocks castling. Only what happens to the king, its start square, the square it crosses, and the square it lands on, counts.
Castling with the king still under attack, or castling straight into an attack, is illegal in exactly the way moving your king into check anywhere else on the board is illegal. The shorthand players use, “you can’t castle out of, through, or into check,” covers all three king-safety clauses in one phrase.
One move, one touch. Under FIDE’s touch-move rule, castling is legally a king move. Touch the king first when you play it. If you touch the rook first, you’re required to play a rook move instead, not castle. This is a real source of disputes at scholastic tournaments, and it’s the reason strong players train themselves to move the king before the rook every single time, out of habit, even in casual games where nobody is enforcing it.
Castling in practice
Satisfying the three conditions does not make a king safe by itself. It only makes the move legal. The position around the king still has to hold up, and one of the most famous short games in chess history exists specifically because it didn’t.
In a friendly game in London in 1853, both players castled queenside: Samuel Boden’s king went to c8 on move 10, and his opponent, recorded only as Schulder, followed with O-O-O on move 13, tucking his own king onto c1. Every condition for castling was satisfied both times. For White, it was fatal two moves later.
Schulder White Boden Black


Watch what the castling move actually did, and notice that it broke none of the three conditions. Nobody’s king or rook had moved before; b1, c1, and d1 were all empty; and c1 itself wasn’t attacked at the moment White castled, since White’s own pawn on b2 still blocked the a3-c1 diagonal. Castling queenside was completely legal. It was also a walk toward danger, because Black’s bishop on f5 already controlled b1, the king’s only other escape square, along the open f5-e4-d3-c2-b1 diagonal. Two moves later, 13…d5 opened the center further, and 14…Qxc3+ forced 15.bxc3, which pulled White’s own b-pawn off b2 and finally cleared the a3-c1 diagonal too. Then 15…Ba3 delivered mate: the bishop on a3 covers c1 through the square the pawn just vacated, and the bishop on f5 still covers b1. Two bishops on crossing diagonals, a king with nowhere to run, a pattern chess literature has called Boden’s Mate ever since.
The lesson generalizes past this one game. Paul Morphy’s Opera Game, played five years later in Paris, shows the opposite failure: Black never castled at all, and Morphy’s pieces tore through the center before the king found any shelter. Between the two games, the point holds from both directions. Castling doesn’t guarantee safety on its own, and not castling is almost always worse. What keeps a king safe is castling early, before the position around it opens up, and reading the diagonals and files that will matter once it does.

Common mistakes
Assuming the rook has to be safe too. It doesn’t. Only the king’s start square, the square it crosses, and the square it lands on matter for the check-related conditions. The rook can be attacked before, during, and after castling, and it can pass through a square an enemy piece controls without any of that affecting legality.
Confusing “escaped a check” with “forfeited the right.” If your king was checked and you blocked the check or captured the checking piece, without moving the king itself, you keep full castling rights. The right is lost only if the king (or that specific rook) physically moved at any point, even once, even if it later returned to its starting square. These are different conditions and beginners regularly mix them up.
Forgetting queenside needs one more empty square than kingside. Kingside castling only requires f1 and g1 (or f8 and g8) to be clear. Queenside requires d1, c1, and b1 (or d8, c8, b8) to be clear, three squares instead of two, even though the king only travels through two of them. The b-file square doesn’t need to be safe from attack, since the king never touches it, but it does need to be empty of pieces. Players who forget this try to queenside castle a move too early and find it’s still illegal.
How to improve at castling decisions
The legal mechanics take about ten minutes to memorize. The judgment, when to castle, which side, and when the normal advice (“castle by move ten”) doesn’t apply, takes longer and is really a question of overall opening principles, not castling in isolation. Chess strategy for beginners covers the broader development framework castling sits inside: control the center, develop pieces before moving them twice, then get the king to safety.
For the clearest demonstration of what happens when a player follows those principles and what happens when an opponent doesn’t, Logical Chess: Move by Move annotates 33 full games move by move, and king safety, meaning castling timing, decides a large share of them. For a deeper look at why king safety functions as one of the fundamental “imbalances” that shape a position, alongside material and pawn structure, How to Reassess Your Chess by Jeremy Silman builds an entire evaluation method around exactly that question.
Once castling itself is automatic, the next skill is reading chess notation well enough to follow annotated games like the ones above, then working through a genuine beginner study plan rather than memorizing rules in isolation. The pawn promotion rule is the other special move worth learning the same way: precisely, from the actual FIDE text, not from whatever half-remembered version got passed down at a local club.

Sources
- FIDE Laws of Chess, Article 3.8 (Castling)
- Wikipedia. “Castling.” (rule mechanics and historical development, 1620–1843)
- Wikipedia. “Boden’s Mate.” (Schulder vs. Boden, London 1853, game score)
- R Schulder vs Samuel Boden (1853), chessgames.com
- Hooper, David, and Kenneth Whyld. The Oxford Companion to Chess. Oxford University Press, 1992.
- Chernev, Irving. Logical Chess: Move by Move. Batsford. (affiliate)
- Silman, Jeremy. How to Reassess Your Chess, 4th edition. Siles Press. (affiliate)
This page contains affiliate links. As an Amazon Associate, DiscussChess earns from qualifying purchases.
Sources
- FIDE Laws of Chess, Article 3.8 (Castling)
- Wikipedia. "Castling." (historical development of the rule, 1620–1843)
- Wikipedia. "Boden's Mate." (Schulder vs. Boden, London 1853, game score)
- R Schulder vs Samuel Boden (1853), chessgames.com
- Hooper, David, and Kenneth Whyld. The Oxford Companion to Chess. Oxford University Press, 1992.
Further reading
- Logical Chess: Move by Move, Irving Chernev ASIN verified via Open Library 2026-07-12. Chernev annotates every move of 33 games around the same principle this article covers: develop fast, castle early, punish anyone who doesn't.
- How to Reassess Your Chess (4th ed.), Jeremy Silman ASIN verified via Open Library 2026-07-12 (Open Library record confirms title, author Jeremy Silman, 2010). Silman treats king safety as one of chess's core imbalances, the natural next step after learning the castling rule itself.